
Table of Contents
- Step 1: Identify Signs of Mold in Crawl Space and Measure Moisture
- Step 2: Seal and Encapsulate with a Vapor Barrier
- Step 3: Install a Crawl Space Dehumidifier
- Step 4: Improve Drainage and Fix Plumbing Leaks
- Step 5: Improve Ventilation and Air Circulation
- Step 6: Understand Crawl Space Encapsulation Cost
- Safety Protocols and Long-Term Maintenance Checklist
- When to Call a Professional for Crawlspace Mold
- Frequently Asked Questions
Last Updated: September 19, 2026
Step 1: Identify Signs of Mold in Crawl Space and Measure Moisture
Crawlspace mold is a fungal growth that thrives when wood and soil stay damp and the air stays humid. Spotting it early is the single cheapest fix you’ll ever make. Wait too long and you’re paying for joist replacement instead of a dehumidifier.
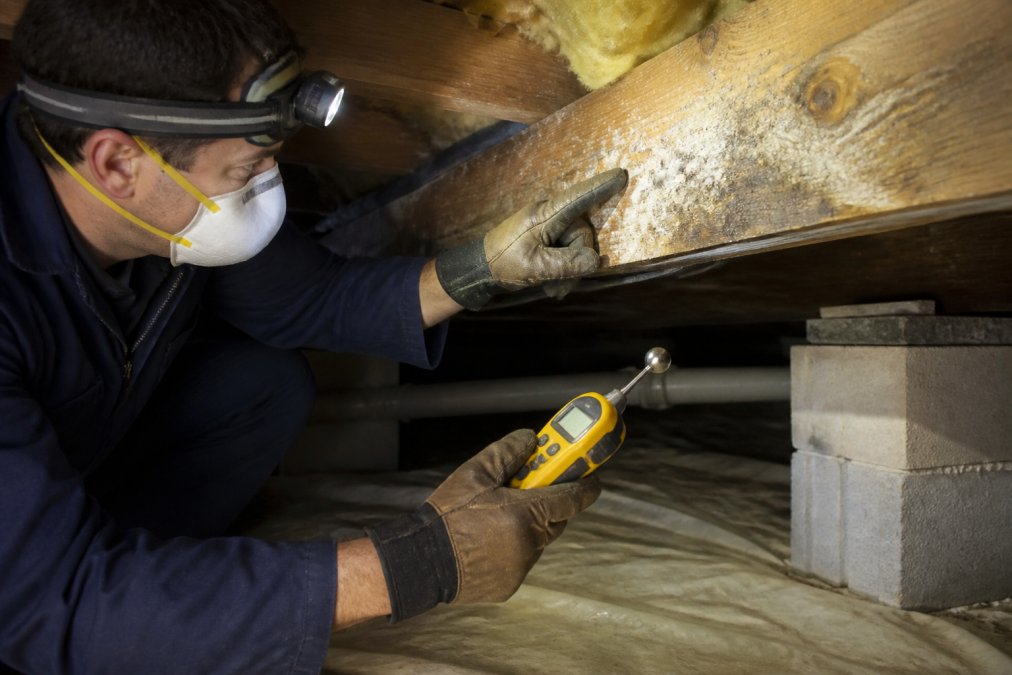
Visual Inspection Checklist
Work through this list before you buy anything:
- Discolored or fuzzy patches on wood joists
- Warped, sagging, or soft sub-floor panels
- Condensation on pipes, ducts, or the vapor retarder
- Rust on nails, hangers, and HVAC ductwork
- Insulation batt that sags, darkens, or feels damp
- Standing water or muddy soil near the foundation
- White chalky residue, a sign of efflorescence and seepage
If you find joist rot or crumbling wood, stop and call a pro. That’s structural, not cosmetic.
Tools for Confirming Moisture Problems
Your eyes can lie. Instruments don’t. Three tools settle the question fast:
- Moisture meter: pin-type meters read wood content directly. Anything above 20% means trouble.
- Hygrometer: measures relative humidity. Keep the crawl space below 60%.
- Thermal camera: shows cold spots where condensation forms.
Don’t run a dehumidifier or seal a vapor barrier until you’ve found the water source. Sealing a wet crawl space traps moisture and feeds mold growth instead of stopping it.
Step 2: Seal and Encapsulate with a Vapor Barrier
Encapsulation is the highest-value step you can take. A vapor barrier stops ground moisture from evaporating into the crawl space air. Ground moisture is the source of most crawlspace humidity.
Materials and Sealing Seams
Here’s what a proper barrier install looks like:
- Vapor retarder: 6-12 mil reinforced polyethylene
- Seam tape: butyl or foil tape rated for crawl spaces
- Fasteners: cap nails or adhesive for wall attachment
- Insulation: rigid foam board on walls, not fiberglass batts
Run the barrier up the foundation walls 6-12 inches. Seal around piers, pipes, and the crawl space access door. Any gap becomes a leak path.
Step 3: Install a Crawl Space Dehumidifier
A crawl space dehumidifier removes the moisture a barrier can’t catch. It’s the difference between a dry space and a damp one.
Crawl space dehumidifier installation basics:
- Place the unit on a level surface, raised off the ground
- Route the condensate drain to a sump pump or outside
- Set the target humidity between 50% and 55%
- Add a hygrometer to confirm it’s holding
Buy a dehumidifier with a built-in humidistat and a remote drain option. Emptying a bucket by hand gets old fast, and the unit shuts off the moment the bucket fills.
Step 4: Improve Drainage and Fix Plumbing Leaks
Water has to go somewhere. If the ground around your foundation slopes toward the house, you’re feeding the problem every time it rains.
Fix the outside first:
- Grade soil to slope away from the foundation
- Clean gutters and extend downspouts 6-10 feet out
- Install a French drain where water pools
- Add a sump pump if the crawl space floods
Step 5: Improve Ventilation and Air Circulation
Ventilation advice has flipped in the last decade. Old guidance said open the foundation vents and let air flow. Modern building science says that’s wrong in humid climates.
In humid climates, sealed and conditioned beats vented every time. Open vents bring in moisture, not fresh air.
Step 6: Understand Crawl Space Encapsulation Cost
Crawl space encapsulation cost depends on size, condition, and how much repair is needed. There’s no single number, and any quote that doesn’t include an inspection is a guess. But you can still build a realistic budget before anyone walks your foundation.
What Actually Drives the Price
Four variables move the number more than anything else:
- Square footage. Material and labor scale almost linearly with floor area.
- Condition. A dry, clean space with intact joists is a straight install. Rot, standing water, or pest damage adds repair labor before encapsulation even starts.
- Dehumidifier and drainage. A commercial-grade unit plus a condensate route to a sump or exterior drain is a separate line item from the barrier itself.
- DIY vs. hired crew. This is the single biggest swing factor, and it’s the one most articles gloss over.
DIY vs. Professional: A Realistic Cost-Benefit
A common pattern is that DIY saves on labor but shifts risk onto you. Here’s how to think about it honestly:
DIY route
- You buy the vapor retarder, seam tape, fasteners, rigid foam board, and a dehumidifier yourself.
- You supply the labor, which is the bulk of a professional quote.
- You own the failure mode: a seam that lifts, a pier that isn’t sealed, or a barrier that traps moisture instead of blocking it. A failed install means paying twice, once for materials, once for a pro to redo it.
- Best fit when the space is dry, accessible, and small, and you’re comfortable working in tight, low clearance.
Professional route
- The quote bundles a moisture assessment, a sealed system, drainage work, and typically a warranty.
- You pay for someone else’s experience with the specific failure points in your foundation type.
- Best fit when there’s existing water intrusion, structural repair, or you need documentation for a home sale.
A Decision Framework
Ask three questions before you choose:
- Is the space dry right now? If water is still entering, fix drainage first. Encapsulating a wet space traps moisture and feeds mold.
- Is the wood sound? Soft or crumbling joists mean structural work that isn’t a DIY job.
- Do you need a warranty or clearance letter? If you’re selling, a professional install with documentation is often the faster path.
For a real number, get an on-site quote, and get more than one. FEMA guidance on flood and moisture damage is worth reading before you spend, especially if you’ve had water intrusion before.
Ask every contractor whether the quote includes the dehumidifier, the drainage route, and a post-install moisture reading. A quote that lists only “vapor barrier” is incomplete.
Safety Protocols and Long-Term Maintenance Checklist
Safety comes before speed. Mold spores, sewage, and crawl space air can all make you sick. Protect yourself or hire someone who will. Then keep the space dry with a schedule built around how your climate actually behaves.
DIY Safety for Mold Removal
Before you touch anything, gear up:
- Respirator: N95 minimum, P100 for heavy growth
- Gloves and eye protection: sealed goggles, not safety glasses
- Coveralls: disposable, taped at the wrists and ankles
- HEPA vacuum: for cleanup, never a shop vac
- Fungicide: EPA-registered, used per label
Never dry-scrape mold. That launches spores into the air. Mist surfaces first to keep spores down. Set up containment, plastic sheeting over the access opening, so spores don’t migrate into living space.
Climate Changes Your Strategy
This is the part most guides skip, and it’s the difference between a fix that holds and one that fails in the first humid season.
Humid and coastal climates
- Sealed and conditioned crawl spaces win. Open foundation vents pull in warm, damp air that condenses on cool joists.
- Run the dehumidifier year-round, not just in summer.
- Prioritize a continuous, sealed vapor retarder and a condensate drain that never backs up.
Arid and dry climates
- Ventilation can work in your favor because outside air is often drier than the crawl space.
- Watch for the opposite problem: over-sealing a space with no dehumidification can trap moisture from soil or plumbing.
- Focus on drainage and grading, since the rare heavy rain does most of the damage.
Cold climates
- Condensation forms where warm, moist interior air meets cold surfaces. Air-seal the floor above and insulate foundation walls with rigid foam, not fiberglass batts.
- Keep the space sealed and conditioned so pipes don’t freeze and humidity stays controlled.
Monthly, Seasonal, and Annual Tasks
| Task | Frequency | What to Check |
|---|---|---|
| Read hygrometer | Monthly | Humidity stays under 60% |
| Inspect for leaks | Monthly | Pipes, A/C lines, ducts |
| Empty dehumidifier drain | Monthly | No clogs or backups |
| Check barrier seams | Seasonal | No tears or gaps |
| Clean gutters | Seasonal | Water flows away |
| Full moisture inspection | Annually | Meter readings on joists |
| Service dehumidifier | Annually | Filter and coils |
Seasonal Triggers to Watch
- Spring thaw and heavy rain: check grading, downspouts, and sump operation. This is when hydrostatic pressure peaks.
- Summer humidity: confirm the dehumidifier is holding target and the condensate line isn’t clogged.
- Fall: clear gutters before leaf drop fills them, and inspect the barrier before cold weather sets in.
- Winter: watch for condensation on cold pipes and ducts, and confirm air sealing above.
Print this. Tape it inside the access door. A crawl space you never check is a crawl space that grows mold.
Skipping the annual inspection is the most common reason mold comes back. Small leaks and seam tears go unnoticed until the damage is expensive.
When to Call a Professional for Crawlspace Mold
Call a pro when the growth is widespread, the wood is soft, or you’ve had water intrusion more than once. DIY works for small, dry-surface spots. It fails when the source is hidden.
Signs it’s time to hire out:
- Mold covers more than 10 square feet
- Joists or sub-floor are soft, warped, or crumbling
- You smell mold throughout the house
- Water keeps coming back after you’ve sealed and dried
- You’re selling the home and need clearance documentation
Frequently Asked Questions
How common is mold in a crawl space?
Crawl space mold is very common, especially in humid climates and older homes with poor ventilation or drainage. Any space with relative humidity above 60% and organic materials like wood joists or insulation batts can support fungal growth within 24 to 48 hours of a moisture event. Regular inspections and moisture meters help catch problems early.
Does a dehumidifier prevent mold in a crawl space?
A crawl space dehumidifier keeps relative humidity below 50%, which stops mold spores from colonizing. It works best when paired with a sealed vapor barrier and closed foundation vents. Without encapsulation, a dehumidifier fights constant ground moisture and runs inefficiently. Installation should be sized to the cubic footage of the space.
What can I spray in my crawlspace to kill mold?
For small surface mold on joists, a fungicide or a diluted bleach solution can kill active growth, but spraying alone does not fix the moisture source. Mold returns within weeks if relative humidity stays high. After treatment, correct drainage, seal seams in the vapor barrier, and run a dehumidifier to keep the space dry long-term.
How do I know if I have mold in my crawl space?
Look for a musty odor rising into living areas, visible dark or white patches on joists, condensation on pipes, or warped sub-floor. A moisture meter reading above 20% on wood or a hygrometer showing relative humidity over 60% signals a problem. Signs of mold in crawl space often include allergic reactions indoors.
Crawlspace mold keeps coming back when the moisture source is never actually found. At Aquaflame Restores it, our IICRC-trained technicians track down the root cause, not just the visible growth. We offer 24/7 emergency response, a 30-minute arrival guarantee, and direct insurance billing so you’re not fighting your adjuster alone. Get started with Aquaflame Restores it and dry out your crawl space for good.