
Table of Contents
- How Long Does It Take for Mold to Grow After Water Damage?
- Step 1: Immediate Water Removal and Safety Precautions
- Step 2: Structural Drying and Ventilation Techniques to Prevent Mold
- Step 3: Cleaning, Disinfecting, and Removing Damaged Materials
- When to Call a Professional for Water Damage
- Post-Remediation Testing: Confirming Your Home Is Mold-Free
- Conclusion
- Frequently Asked Questions
Last Updated: September 11, 2026
How Long Does It Take for Mold to Grow After Water Damage?
Mold can begin growing in as little as 24 to 48 hours after water damage, which is why the first two days decide whether you’re dealing with a minor cleanup or a full remediation project (the CDC). Mold spores are already present in nearly every indoor environment; they only need moisture to colonize. This guide walks through the exact steps to prevent mold after water damage, from extraction to final testing.
The 48-hour rule is a practical deadline: once porous materials like drywall and carpet stay wet past that window, spore growth moves from possible to probable, and cleanup shifts from drying to demolition.
Step 1: Immediate Water Removal and Safety Precautions
Your first move is safety, not extraction. Standing water can hide electrical hazards, sewage contamination, and structural weaknesses. Shut off power to affected areas at the breaker before entering; if you can’t reach it safely, call an electrician or your utility first.
Once the area is safe, remove standing water fast, every hour lets moisture wick deeper into subfloor, drywall, and framing. But how you extract, and how much protective gear you wear, depends on the water category.
Identify the Water Category Before You Touch Anything
The restoration industry sorts water damage into three categories, each changing your safety protocol and salvage odds:
- Category 1, clean water. From a supply line, burst pipe, sink or tub overflow, or rainwater that hasn’t touched the ground. Safe to handle, and most porous materials can be dried and saved within the 48-hour window.
- Category 2, gray water. From a washing machine discharge, dishwasher, toilet bowl (not the tank), or sump pump failure. It carries bacteria and nutrients that accelerate microbial growth, so soaked carpet pad and drywall are usually a loss even if they look fine.
- Category 3, black water. From sewage backups, toilet backflow (bowl water with waste), outdoor flooding, or water that has sat long enough to grow dangerous bacteria. Grossly contaminated: anything porous it touches, carpet, pad, drywall, insulation, upholstered furniture, should be removed and discarded, not dried.
Here’s the part that trips people up: water can downgrade over time. Category 1 water that sits more than 48 hours, or flows through a wall cavity and picks up contaminants, becomes Category 2; Category 2 that sits long enough becomes Category 3. The same puddle gets more dangerous the longer it stays.
If you can’t tell where the water came from, treat it as Category 2 or higher until you know otherwise.
Water extraction priorities:
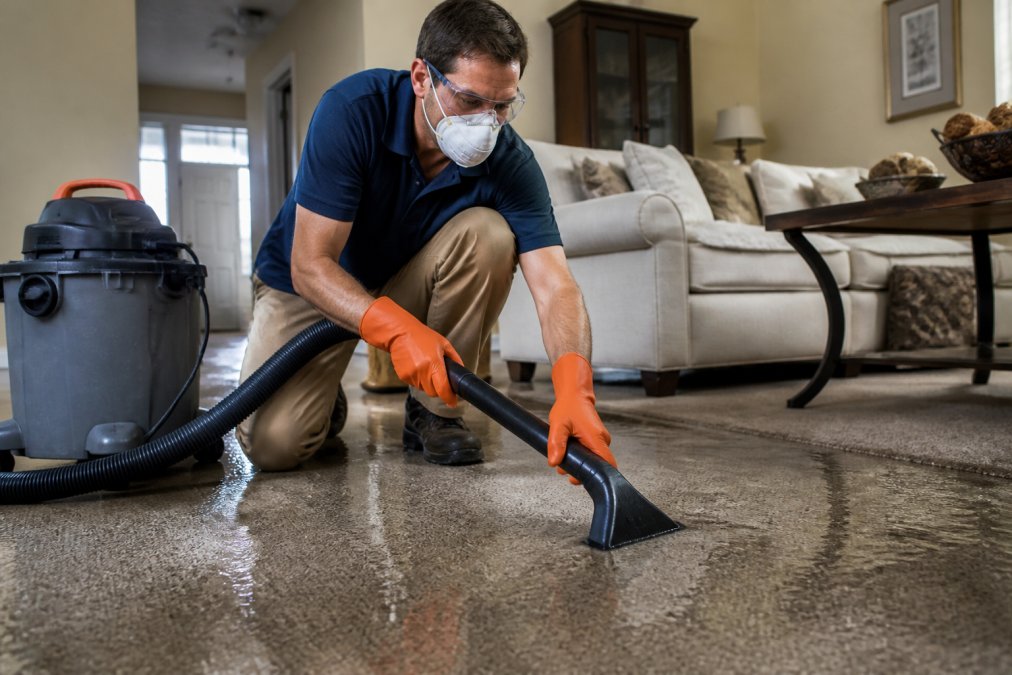
- Use a wet/dry vacuum or sump pump for standing water, but only for Category 1. For Category 2 or 3, call a professional before you start.
- Remove saturated rugs, cushions, and cardboard immediately
- Blot remaining moisture from non-porous surfaces
- Lift furniture legs onto foil or blocks to prevent wicking
- Bag and discard porous items that contacted Category 3 water, do not try to launder or dry them
Personal Protective Equipment (PPE) for Water Damage Cleanup
Wear an N95 respirator, safety goggles, and rubber gloves before entering any water-damaged space (the CDC). For sewage backups or outdoor flooding, add waterproof boots and consider a full-face respirator.
The reason is simple: floodwater and sewage contamination introduce bacteria and airborne particles that a standard dust mask won’t filter. The CDC guidance on floodwater safety outlines specific PPE recommendations for cleanup after flooding, and it’s worth reviewing before you start.
Match your gear to the category:
- Category 1: N95 respirator, goggles, rubber gloves, waterproof boots.
- Category 2: Add a half-face respirator with P100 cartridges, and cover any cuts or scrapes with waterproof bandages before you start.
- Category 3: Full-face respirator with P100 cartridges, waterproof boots, disposable coveralls, and double gloves. Anyone with a compromised immune system, asthma, or an open wound should not be in the space at all.
Never mix bleach with ammonia-based cleaners during disinfection. The combination produces toxic chloramine gas, and it’s a common mistake when people grab whatever’s under the sink in a panic.
Step 2: Structural Drying and Ventilation Techniques to Prevent Mold
Structural drying means removing moisture from materials, not just the air. A wet subfloor or wall cavity keeps feeding humidity into the room until it’s dried from the inside out. Open windows and doors where weather allows, and run fans to circulate air across wet surfaces.
The tools that matter most are a dehumidifier, a moisture meter, and patience. A hygrometer measures relative humidity in the air; a moisture meter measures moisture inside materials. You need both, because air can read dry while drywall is still waterlogged.
Target relative humidity below 50% in the affected area. Keep ventilation running continuously, and check the HVAC system to make sure you’re not circulating damp air through the rest of the house.
How Long Each Material Takes to Dry (and When to Give Up)
Different materials hold water differently and hit the mold-growth threshold at different speeds, this is where DIY drying quietly fails.
- Drywall (gypsum board): Paper facing wicks water fast. If the paper is wet but the core is firm, it can often be dried in place with air movers in 24-48 hours. If the core is soft, crumbly, or peeling, cut it out, standard practice is removing drywall 12-24 inches above the visible water line to expose the wall cavity.
- Wood framing and subfloor: Solid lumber dries slowly, often 3-7 days with continuous airflow and dehumidification. Wood above roughly 16% moisture content risks mold and rot; a pin-type moisture meter is the only reliable way to know.
- Hardwood flooring: Can sometimes be saved with specialty drying mats that pull moisture up through the boards, but this is a professional technique. Cupped, buckled, or crowned boards usually need replacement.
- Carpet and pad: Pad almost never survives a serious soak, it’s a sponge with no airflow. Carpet can sometimes be dried if it’s Category 1 water and you lift it to dry the pad and subfloor underneath; Category 2 or 3 means both go in the trash.
- Insulation: Fiberglass batts that have been compressed or soaked lose their R-value and should be replaced. Closed-cell spray foam can often be dried in place.
- Concrete and tile: Slow to dry but tolerant of moisture. The concern is what’s underneath, adhesive, thinset, and the subfloor.
A useful rule of thumb: if a material can’t be dried to a safe moisture reading within 48 hours, it’s a candidate for removal. Drying a doomed material just delays the mold problem.
Verifying the Dry-Out With Actual Readings
“Dry to the touch” is not dry, the only way to know a structure is dry is to measure it. Here’s what to check:
- Wood moisture content: Aim for readings within a few percentage points of a dry reference sample from an unaffected part of the home. In most climates that means under about 16%, and ideally closer to 12%.
- Drywall: A pin meter should read in the normal range for the material, typically under 1% on the meter’s scale for gypsum. Compare against an unaffected wall in the same room.
- Relative humidity: Keep the affected area below 50%, and ideally within 10 points of the rest of the house.
- Daily logging: Take readings at the same spots every day and write them down. If a reading isn’t dropping, you have a hidden moisture source, a slow leak, a blocked wall cavity, or a subfloor that isn’t getting airflow.
This is also where the DIY/pro gap shows up. Consumer meters give a single point reading; restoration crews use thermal imaging and penetrating meters to map moisture across an entire wall or floor, finding the wet spot behind the baseboard you’d never see.
Best Dehumidifiers for Water Damage and Managing Humidity Levels
The best dehumidifiers for water damage are refrigerant models with high pint capacity and a hose-drain option. For a single flooded room, look for 50 pints or more per day; for whole-floor drying after significant flood damage, a commercial-grade unit rated 100+ pints, which is what restoration crews bring in.
Consumer dehumidifiers are built for maintenance, not disaster recovery. They work fine for a damp basement but struggle with a waterlogged subfloor, which is why professional drying often involves multiple high-capacity units running around the clock.
Pair the dehumidifier with air movers, high-velocity fans aimed at a low angle across wet surfaces. Air movement evaporates moisture; the dehumidifier pulls it from the air. One without the other just moves the problem around.
Place dehumidifiers in the center of the room, not against a wall. Airflow on all sides dramatically improves how efficiently the unit pulls moisture from the space. Aim air movers at a 15-45 degree angle toward the wall so air sweeps up the surface rather than bouncing off it.
Drying isn’t done when the room feels dry. It’s done when a moisture meter says the materials are dry. If you don’t own one, that’s the single best $30-$60 you’ll spend on this project, or the reason to call someone who does.
Step 3: Cleaning, Disinfecting, and Removing Damaged Materials
Cleaning comes after drying, never before, disinfecting a wet surface is wasted effort because moisture reactivates microbial growth within hours. Once materials are dry and moisture readings are acceptable, clean all non-porous surfaces with a disinfectant rated for the job.
Use an EPA-registered disinfectant, or diluted bleach for hard, non-porous surfaces. Apply, let it sit for the label’s contact time, then wipe, rushing leaves mold colonies intact.
Materials that usually need removal:
- Saturated drywall and insulation (cut out 12-24 inches above the water line)
- Waterlogged carpet and pad
- Porous materials with visible spore growth
- Warped subfloor sections
Porous materials rarely survive a serious flood. Once mold colonies establish inside drywall or carpet padding, surface cleaning can’t reach the roots, cutting them out and replacing them is the honest fix.
When to Call a Professional for Water Damage
Call a professional when water has stood longer than 24 hours, when damage involves sewage or outdoor floodwater, or when moisture has reached wall cavities, ceilings, or subfloor. These are the situations where DIY drying fails quietly, leaving hidden moisture that fuels mold weeks later.
A few specific triggers should push you straight to a phone call:
- Category 3 water (black water from sewage, toilet backflow, or outdoor flooding) carries serious contamination and requires professional extraction and sanitization
- More than 10 square feet of visible mold exceeds what most homeowners should handle themselves
- Wet ceilings or structural framing need moisture mapping that consumer tools can’t provide
- Insurance claims are easier to document when a licensed restoration team records moisture readings from day one
This is where Aquaflame Restores it comes in. Their IICRC-trained technicians handle water extraction, structural drying, and full reconstruction as a single team. They also bill insurance directly.
The line between DIY and professional isn’t about square footage alone. It’s about whether moisture has reached materials you can’t see or dry yourself. When in doubt, get a moisture assessment.
Post-Remediation Testing: Confirming Your Home Is Mold-Free
Post-remediation testing confirms the job is actually done, and it’s the step most homeowners skip. Visual inspection only catches surface growth; testing verifies airborne spore levels have returned to normal and no hidden colonies remain.
The process typically involves air and surface sampling compared against an outdoor baseline, documented in a clearance report. If you’re selling, that documentation is often what a buyer’s lender requires before closing.
What testing should cover:
- Airborne spore counts in each affected room
- Surface samples from previously wet materials
- Moisture content verification in subfloor and framing
- A written clearance report
If a contractor offers to skip testing after remediation, that’s a red flag. Testing is how you know the problem is solved rather than just hidden.
Conclusion
Water damage gets more expensive with every passing hour, and the difference between a straightforward drying job and full mold remediation usually comes down to how fast someone acts. If you’re facing standing water, sewage backup, or moisture you can’t trace, waiting always costs more.
Aquaflame Restores it responds 24/7 with a 30-minute arrival guarantee across metro Atlanta, staffed by IICRC-trained technicians who handle extraction, structural drying, and reconstruction under one roof. They manage direct insurance billing and provide clearance documentation. Get started with Aquaflame Restores it and stop water damage before it becomes a mold problem.
Frequently Asked Questions
How long does it take for mold to grow after water damage?
Mold can begin to grow in as little as 24 to 48 hours after water damage occurs. This is why the 48-hour rule is critical: if you can dry affected areas within two days, you have a much better chance of preventing mold colonies from forming. If water sat for longer, or if materials like drywall and carpet stayed wet, mold growth is likely already underway and you may need professional remediation.
Can I prevent mold growth on my own after a small leak?
Yes, for small leaks and clean water (Category 1), you can often handle it yourself. Start by extracting water with a wet/dry vacuum, then use fans and a dehumidifier to dry the area. Monitor moisture content with a hygrometer or moisture meter. If the area dries within 48 hours, you likely prevented mold. However, if the leak involved gray water or black water, or if materials remain wet beyond 48 hours, call a professional.
What will keep mold from coming back after water damage?
The key is thorough drying and addressing the moisture source. Use ventilation and dehumidifiers to get relative humidity below 50%. Clean and disinfect non-porous surfaces with an antimicrobial product. Remove and replace porous materials like drywall and insulation if they were soaked. If you had sewage contamination, professional sanitization is required. Finally, fix the underlying leak or drainage issue to prevent future water damage.
What are the first signs of mold growth after water damage?
Look for a musty, earthy odor, which is often the first sign. You may also see discoloration on walls, ceilings, or floors, such as black, green, or white spots. Peeling paint or wallpaper, warped baseboards, and visible water stains can indicate hidden mold. If you experience allergy symptoms like sneezing or coughing only when in that room, mold may be present. A moisture meter can help detect hidden moisture.