
Table of Contents
- Why Early Detection of Hidden Pipe Leaks Matters
- Method 1: Check Your Water Meter for Hidden Leaks
- Method 2: Look for Visual Signs of Water Damage
- Method 3: Inspect Common Leak Areas
- Method 4: Use Smart Water Leak Detectors for Home
- Method 5: Recognize Signs of a Slab Leak
- When to Call Water Damage Restoration Services
- Conclusion
- Frequently Asked Questions
Last Updated: September 28, 2026
A hidden water leak can cost thousands in damage before you notice it. Early detection prevents structural damage and expensive remediation. You don’t need expensive equipment or a plumber to detect hidden pipe leaks early. This guide covers five practical methods to identify leaks before they become catastrophic.
Why Early Detection of Hidden Pipe Leaks Matters
A small pinhole leak can waste thousands of gallons annually while remaining invisible (the EPA). Mold grows within 24-48 hours of moisture exposure (the CDC). Early detection prevents cascading problems: warped flooring, bubbling paint, damp patches, and system corrosion. Detecting a leak within days instead of weeks cuts repair costs dramatically. The five methods below require minimal investment and take under 15 minutes.
Method 1: Check Your Water Meter for Hidden Leaks
Your water meter is the most accurate tool for confirming a system-wide leak. Locate your meter, note the reading, turn off all fixtures, wait 2-3 hours, then check again. If the reading changed, you have an active leak.
The stop tap test confirms a leak exists but doesn’t pinpoint its location. Use this as your first diagnostic step, then move to visual inspection methods to narrow down where the leak is occurring.
This method detects internal leaks hidden inside walls or under slabs but doesn’t pinpoint whether the leak is in the supply or drain line.
Method 2: Look for Visual Signs of Water Damage
Visual inspection catches leaks that have already started causing damage. Water stains, bubbling paint, warped flooring, and damp patches are all red flags that moisture has been present for days or weeks.
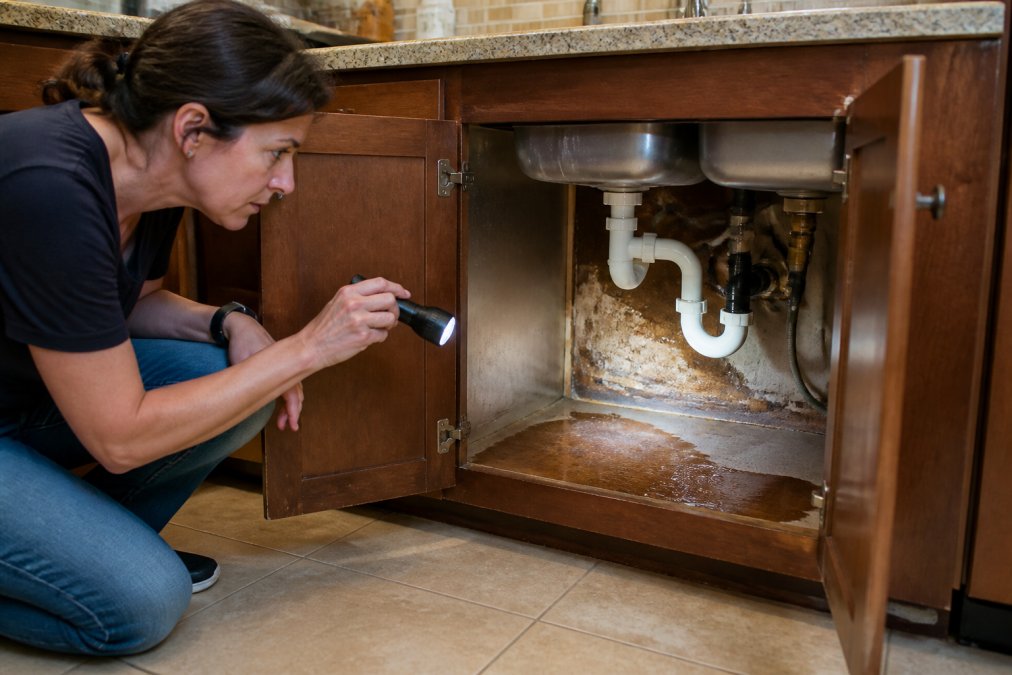
Water stains and bubbling paint
Water stains appear as discolored patches (light brown to dark yellow) on ceilings, walls, or under cabinets. Bubbling or peeling paint indicates trapped water. Check under sinks, around toilet bases, and ceilings below bathrooms or kitchens. Stains that reappear after drying suggest an active leak.
Warped flooring and damp patches
Warped or buckled flooring (cupped wood, swollen laminate, lifted vinyl) indicates sustained moisture. Damp patches on walls or crawlspace surfaces feel cool and wet. Visible moisture or mold growth on joists and insulation signals water intrusion.
Method 3: Inspect Common Leak Areas
Leaks cluster in specific locations where pipes are under stress or exposed to temperature fluctuations. However, the symptoms and failure patterns differ significantly depending on your pipe material, a critical detail most homeowners overlook.
Pipe material-specific leak indicators
PEX pipes fail at connection points and kinked areas. Inspect fittings where PEX enters walls or runs through joists. Leaks at compression fittings weep slowly before pooling becomes visible. PEX degrades under direct sunlight, so check outdoor supply lines and areas near water heaters.
Toilets, faucets, and showerheads
Toilets are the most common silent household leak source. Test the flapper valve: add food coloring to the tank and wait 15-20 minutes without flushing. If color appears in the bowl, the flapper is leaking and can waste 200+ gallons daily.
Under-sink cabinets and water heater
Water heaters leak at the drain valve, relief valve, or tank seams. Check the floor monthly, even slow drips accumulate to gallons per day. Discoloration or mineral deposits indicate leaking. If your water heater is over 10 years old, internal leaks may be imminent.
If your home was built before 1980, prioritize inspection of galvanized steel connections and solder joints on copper pipes. If built between 1980-2000, focus on copper pinhole leaks and PEX fitting compression points. Homes built after 2000 with PEX are lower-risk for pinhole corrosion but require attention to fitting integrity.
Method 4: Use Smart Water Leak Detectors for Home
Smart sensors provide real-time monitoring and alert you to pooling water before it spreads. These devices range from simple battery-operated sensors to comprehensive whole-home monitoring systems.
Real-time monitoring systems
Whole-home systems like Flo by Moen or Phyn Plus install on your main water line and detect pinhole leaks invisible to the naked eye. They send smartphone alerts within minutes and can shut off water automatically. Both integrate with smart home systems and track daily usage to spot consumption spikes.
Targeted sensor placement
Targeted sensors cost less than whole-home systems and alert you when pooling water is detected. Place them under sinks, near water heaters, in crawlspaces, and around washing machines. Prioritize areas where leaks cause the most damage: under sinks, near appliances, and in basements or crawlspaces.
Smart sensors catch leaks after water has already pooled, not before flow begins. Combine sensors with a whole-home flow monitor for comprehensive leak detection across your plumbing system.
Method 5: Recognize Signs of a Slab Leak
Slab leaks occur in supply lines running beneath concrete foundations. They’re expensive to repair because accessing the pipes requires breaking concrete. Early detection prevents foundation damage and mold growth in crawlspaces. However, slab leak symptoms overlap with other moisture problems, so systematic diagnosis prevents false alarms and unnecessary professional calls.
Diagnostic flowchart for suspected slab leaks
Run your water meter test (Method 1). If the meter shows active water loss with all fixtures off, you have a leak. Turn off your main water shutoff valve and wait 2 hours. If the meter reading changes while the shutoff is off, the leak is in your drain system.
Water bill analysis and pressure testing
Your water bill spikes when a slab leak is active. Compare your current bill to the same month last year. If usage jumped 20% or more without changes in occupancy, a slab leak is likely. Pressure testing ($150-300) is the definitive diagnostic tool. A plumber isolates your supply line and pressurizes it with air or nitrogen.
Crawlspace moisture and mold indicators
Slab leaks in supply lines don’t always cause visible water pooling, instead, moisture seeps into crawlspaces below the slab. Inspect your crawlspace monthly if you have one. Look for:
- Visible moisture or standing water on the crawlspace floor, especially in areas directly below where you identified warm spots
- Mold growth on joists, insulation, or vapor barriers (appears as black, green, or white fuzzy patches)
- Musty or moldy odors that intensify when you open the crawlspace access door
- Efflorescence (white mineral deposits) on concrete or foundation walls, indicating water has been present for weeks
- Rust staining on metal supports or HVAC ducts, caused by moisture-laden air
When a slab leak requires immediate professional intervention
Slab leaks require professional detection equipment and repair. Call a restoration specialist immediately if you observe:
- Warm spots on your floor confirmed by infrared thermometer
- Water bill increase of 20% or more with no explanation
- Mold growth in crawlspaces or visible moisture pooling below the slab
- New foundation cracks appearing alongside other slab leak indicators
- Pressure testing confirms a leak in your supply line
Do not ignore slab leak symptoms. Even a slow leak wastes hundreds of gallons daily and causes cumulative foundation and structural damage. The longer a slab leak remains undetected, the more expensive the repair and restoration become.
When to Call Water Damage Restoration Services
Some leaks you can address yourself. Others demand professional intervention to prevent structural damage and mold growth.
Call a professional restoration service when:
- Your water meter confirms a leak but you cannot locate it visually
- You discover active mold growth in crawlspaces or walls
- Water damage has already affected drywall, flooring, or insulation
- A slab leak is suspected (confirmed by pressure testing)
- The leak is in a location you cannot safely access
- Water has been present for more than 24-48 hours
Conclusion
Detecting hidden pipe leaks early saves thousands in water bills and restoration costs. Start with your water meter to confirm a leak exists. Move to visual inspection of common problem areas. Use affordable sensors for targeted monitoring. When you discover signs of active water damage or suspect a slab leak, professional restoration services prevent the damage from spreading.
Frequently Asked Questions
How can I detect a hidden pipe leak without professional equipment?
Start with your water meter: turn off all water in your home, then check if the meter dial moves. If it does, you have a leak. Next, look for visual clues like water stains, bubbling paint, warped flooring, or damp patches on walls and ceilings. Inspect common leak areas under sinks, around toilets, and near water heaters. A simple moisture meter (around $25) can help confirm moisture in walls and cabinets. For toilet leaks, add food coloring to the tank and watch if it seeps into the bowl without flushing.
What are the most common signs of a slab leak?
Slab leaks occur in pipes running beneath your foundation. Watch for warm spots on your floor, unusually high water bills despite normal usage, cracks in concrete, mold growth in carpeting, or a persistent musty smell. You may also notice reduced water pressure throughout your home or hear water running when no fixtures are in use. These signs indicate pressure loss in your plumbing system. If you suspect a slab leak, contact a professional immediately, as structural damage can worsen quickly.
How do smart water leak detectors for home actually work?
Smart leak detectors use two main approaches: point sensors that detect pooling water in specific locations (under sinks, near water heaters), and whole-home monitors installed on your main water line that track pressure and flow patterns. Point sensors send instant alerts to your phone when water is detected. Whole-home systems like Flo by Moen or Phyn Plus use advanced pressure sensing to identify pinhole leaks and unusual consumption patterns, often with automatic shut-off capabilities. Budget-friendly options like Govee sensors work well for targeted monitoring.
What should I do if I find signs of a hidden leak?
First, locate your shut-off valve and know how to use it in case the leak worsens. Document the location and take photos. If the leak is visible (water pooling, stains), stop using that fixture immediately. Call a licensed plumber to diagnose and repair the leak before it causes structural damage or mold growth. For significant water damage or if you’re unsure of the leak’s location, contact water damage restoration services that can assess pipe integrity, dry affected areas, and prevent mold. Early professional intervention saves thousands in restoration costs.
If you discover active water damage or suspect a hidden leak you cannot locate, Aquaflame Restores it’s 24/7 emergency team responds within 30 minutes across metro Atlanta. Their IICRC-trained technicians coordinate extraction, drying, and full reconstruction while managing your insurance claim directly. Contact Aquaflame Restores it for immediate water damage mitigation and restoration.