
Table of Contents
- Understanding Black Mold: What You’re Dealing With
- Essential Mold Cleanup Safety Gear You’ll Need
- Best Products to Kill Black Mold Effectively
- How to Remove Black Mold Safely: Step-by-Step Process
- When to Call Professional Mold Remediation Services
- How to Prevent Black Mold Growth Long-Term
- Common Mistakes to Avoid When Removing Black Mold
- The Emotional and Practical Impact of Mold Damage
How to Remove Black Mold Safely: Step-by-Step Guide
Last Updated: July 15, 2026
Black mold poses serious health risks and requires safe handling to prevent spreading mycotoxins throughout your home. This guide walks you through identifying the problem, removing it safely, and preventing future growth.
Understanding Black Mold: What You’re Dealing With
Stachybotrys chartarum, commonly called black mold, thrives in damp environments and produces mycotoxins that trigger allergic reactions, asthma attacks, and respiratory illness. The danger lies in spores and hyphae that become airborne during cleanup without proper containment procedures.
Identifying black mold vs. other mold types
Black mold appears as dark green or black slimy patches on damp surfaces like bathroom tiles, basement walls, or water-damaged areas. However, not all dark mold is Stachybotrys, other species can appear black too. Black mold often has a distinctive musty odor and grows in circular patterns on porous materials. If mold covers more than a small patch (roughly the size of a credit card), assume it requires professional remediation rather than DIY cleanup.
Health risks and why safety matters
Exposure to black mold mycotoxins causes immediate symptoms like coughing, wheezing, and eye irritation, or develops into chronic respiratory problems over weeks. People with asthma, weakened immune systems, or allergies face the highest risk. The real danger emerges during cleanup: disturbing mold without proper containment releases millions of spores into the air, spreading contamination to other rooms and making the problem exponentially worse.
Mixing bleach with ammonia (found in many window cleaners) creates toxic chloramine gas. Never combine cleaning products, and always ensure proper ventilation when using any chemical-based mold killer.
Essential Mold Cleanup Safety Gear You’ll Need
Removing black mold safely requires specific protective equipment that creates a barrier between you and harmful spores.
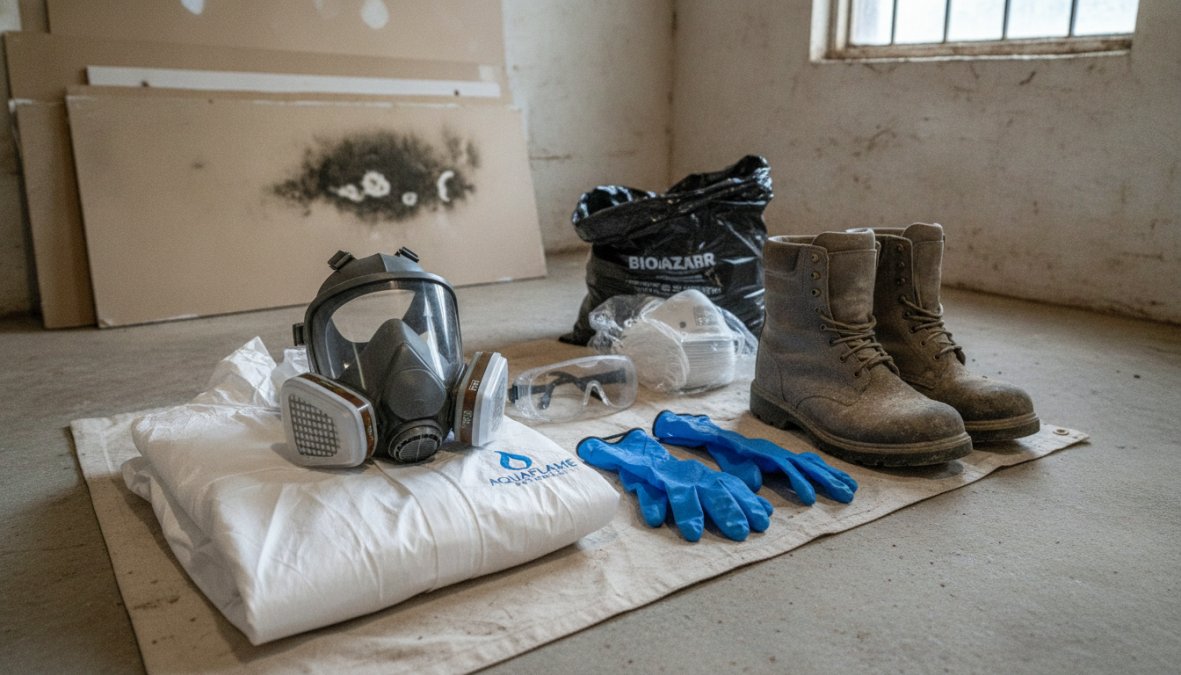
Personal protective equipment checklist
An N95 respirator is non-negotiable, cloth and surgical masks don’t filter mold spores effectively. The respirator must fit snugly with no gaps. Disposable nitrile gloves prevent direct contact with mold and mycotoxins. Safety goggles protect your eyes from spores, and a full-body protective suit (or at minimum long sleeves and pants) prevents spores from settling on your skin and clothes.
Essential PPE for mold cleanup:
- N95 or P100 respirator (fitted properly)
- Nitrile gloves (double-layered for extra protection)
- Safety goggles or face shield
- Full-body protective suit or dedicated work clothes
- Rubber boots or disposable shoe covers
- Head covering to prevent spore contamination in hair
Ventilation and containment tools
Open windows to create cross-ventilation and position a box fan in a window frame pointing outward to push contaminated air outside. Never use ceiling fans or portable fans that circulate air within the room. Seal doorways with plastic sheeting and duct tape to prevent spores from traveling to unaffected areas. A HEPA filter vacuum (never a standard vacuum) helps with cleanup.
Seal doorways with plastic sheeting and duct tape before starting. This containment zone prevents spores from traveling to unaffected areas and is especially critical if mold covers more than a few square feet.
Best Products to Kill Black Mold Effectively
The cleaning product you choose depends on surface type and mold severity.
Natural cleaning solutions: vinegar and baking soda
Distilled white vinegar kills many mold species due to its acidity and is safe for most surfaces. Spray undiluted vinegar directly on mold, let it sit for one hour, then scrub and rinse. Baking soda acts as a natural deodorizer and mild fungicide, mix three teaspoons with one cup of water to create a spray. These options avoid harsh chemical fumes and are safer for homes with children or pets, but work best on light surface mold and aren’t strong enough for extensive infestations.
Commercial fungicides and when to use them
Bleach-based cleaners effectively kill black mold on non-porous surfaces like tile and glass. Mix one cup of bleach with one gallon of water, apply to the mold, wait 10 minutes, then scrub thoroughly. Bleach doesn’t penetrate porous materials like drywall or grout deeply, so mold roots can survive and regrow. For porous surfaces, commercial fungicides formulated for deep penetration work better and often inhibit future mold growth.
How to Remove Black Mold Safely: Step-by-Step Process
Step 1: Assess the affected area and determine scope
Evaluate how much mold you’re dealing with. Small patches (smaller than 10 square feet) can typically be handled with DIY cleanup if you follow proper safety procedures. Larger areas, mold in HVAC systems, or growth following major water damage requires professional remediation. Check for hidden mold behind baseboards, under carpet, and inside walls. Document the affected area with photos for insurance purposes.
Step 2: Prepare your workspace and don protective equipment
Seal the work area with plastic sheeting and duct tape, covering doorways and vents. Open windows and position your exhaust fan or box fan to create negative air pressure. Put on all protective equipment in this order: protective suit, gloves, goggles, and finally your N95 respirator. Place a plastic sheet on the floor to catch debris and spores. Have all cleaning supplies within arm’s reach before you begin.
The preparation phase takes 20-30 minutes but determines whether your cleanup succeeds or spreads contamination. This isn’t a step to rush.
Step 3: Clean hard surfaces and non-porous materials
For tile, glass, and other hard surfaces, apply your chosen cleaner directly to the mold. Let it sit for 10-15 minutes to penetrate and kill the fungal structure. Scrub vigorously with a stiff brush to remove all visible mold and the biofilm underneath. Wipe clean with disposable cloth or paper towels and rinse thoroughly. Hard surfaces are the easiest to remediate because mold doesn’t embed itself deeply.
Step 4: Address porous materials (drywall, grout, caulk)
For small mold patches on grout or caulk, use a commercial fungicide designed for porous surfaces and let it sit 20-30 minutes to penetrate. Scrub with a grout brush to work the product into the pores. If mold has penetrated drywall significantly, the affected section often needs removal and replacement rather than cleaning. Once mold colonizes drywall, it’s nearly impossible to fully eliminate without replacing the material.
Step 5: Control moisture and improve ventilation
Address the underlying water source: fix leaks, improve drainage, reduce humidity, or address condensation issues. Run your HVAC system’s dehumidifier setting or use a standalone dehumidifier to keep indoor humidity below 50 percent. Increase air circulation by opening windows and using exhaust fans in bathrooms and kitchens. Monitor the cleaned area over the following weeks, if mold returns within a month, the moisture problem persists.
When to Call Professional Mold Remediation Services
Size and scope thresholds for DIY vs. professional
Mold covering more than 10 square feet, or any mold in HVAC systems, ductwork, or insulation, requires professional remediation. Mold inside your heating and cooling system spreads spores throughout your entire home every time the system runs. Mold following significant water damage also warrants professional assessment, as water damage often hides mold in walls, crawl spaces, and attics where DIY cleanup can’t reach.
Signs of extensive contamination and structural damage
If mold returns repeatedly despite cleaning, or if affected areas smell musty even after treatment, the problem extends beyond what’s visible. Discolored or soft drywall, warped wood, or visible water stains suggest mold has compromised structural integrity. Professional mold remediation includes post-remediation air quality testing to verify that spore levels return to normal.
How to Prevent Black Mold Growth Long-Term
Humidity control and dehumidifier placement
Maintaining indoor humidity between 30-50 percent creates an inhospitable environment for mold. In bathrooms, run exhaust fans during and for 20-30 minutes after showers. In basements or naturally damp areas, use a dehumidifier running continuously. Condensation on windows, pipes, or walls signals humidity levels are too high and requires investigation.
HVAC maintenance and air quality monitoring
Change HVAC filters every 1-3 months. Have your HVAC system professionally inspected annually to check for mold growth inside ducts and on coils. Consider upgrading to a higher-MERV-rated filter (MERV 11-13) to capture smaller particles, including mold spores. After professional mold remediation, request air quality testing to confirm spore levels have returned to normal.
Common Mistakes to Avoid When Removing Black Mold
Using standard vacuums spreads spores throughout your home instead of containing them, only HEPA-filter vacuums capture mold spores effectively. Painting over mold or applying sealants without removing the growth traps moisture and allows mold to spread underneath. Ignoring moisture sources means mold returns within weeks. Attempting to remove mold from HVAC systems without professional equipment contaminates ductwork and spreads spores throughout your home. Finally, rushing the process or skipping containment procedures turns a localized problem into a house-wide contamination event.
Black mold removal requires careful planning, proper protective equipment, and honest assessment of whether you can handle the job safely. For extensive contamination or mold in HVAC systems, professional remediation is the only reliable solution. Aquaflame Restores it’s IICRC-trained technicians handle complex mold remediation across metro Atlanta with 24/7 emergency response and post-remediation air quality testing to confirm your home is safe.
Frequently Asked Questions
What protective gear do I need to remove black mold safely?
Essential protective equipment includes an N95 respirator or higher-rated mask, nitrile gloves, eye protection (goggles), and a protective suit or long-sleeved clothing. Proper ventilation with HEPA filters is also critical. Never skip respiratory protection, black mold spores and mycotoxins can cause serious respiratory health issues if inhaled. Ensure your workspace has adequate airflow to prevent cross-contamination and spore dispersal to other areas of your home.
How do I identify black mold versus other types of mold?
Black mold (Stachybotrys chartarum) typically appears dark green or black with a slimy texture, often in areas with prolonged moisture exposure. Other molds may be white, orange, or green with different textures. Black mold often grows on water-damaged drywall, wood, and other porous materials. If you're uncertain, visual identification alone isn't reliable, professional testing can confirm the presence of mycotoxins. When in doubt about mold type or extent, contact a professional for proper identification before attempting removal.
When should you hire a professional for black mold removal?
Call professional mold remediation services if the affected area exceeds 10 square feet, mold has penetrated HVAC systems, there's significant water damage or structural compromise, or you have health concerns. Professionals use specialized equipment like HEPA filters and dehumidifiers to ensure complete remediation and post-remediation air quality testing. They're trained in proper containment to prevent cross-contamination. If you're elderly, pregnant, or immunocompromised, professional remediation is strongly recommended regardless of mold size.
What's the best way to prevent black mold from returning after cleaning?
Maintain indoor humidity below 50% using dehumidifiers and proper ventilation. Fix water leaks immediately, ensure adequate airflow in bathrooms and kitchens, and clean HVAC filters regularly. Use exhaust fans during and after showers, improve drainage around your foundation, and consider post-remediation air quality testing to confirm spores haven't spread. Address the moisture source, mold growth requires moisture, so controlling humidity and fixing water damage prevents recurrence more effectively than cleaning alone.
This article was written using GrandRanker