
Table of Contents
- How to Stop Water From a Burst Pipe: Immediate Actions
- Finding and Using the Emergency Water Shut Off Valve
- How to Fix a Leaking Pipe Temporarily
- Signs of a Burst Pipe in Wall and How to Detect It
- Water Removal and Drying Techniques
- Understanding Burst Pipe Repair Cost and Insurance Claims
- When to Contact a Professional Plumber
- Common Mistakes to Avoid During a Plumbing Emergency
Last Updated: July 11, 2026
How to Stop Water From a Burst Pipe: Immediate Actions
When a water pipe bursts, the first few minutes determine whether you minimize damage or face catastrophe. This guide explains how to stop water from burst pipe situations and protect your property before professional help arrives. Water damage claims represent one of the most common and costly homeowner insurance claims, yet most people don’t know the correct sequence of emergency steps.
If water is actively spraying near electrical outlets or your electrical panel, leave immediately and call 911. Electrocution risk takes priority over water damage mitigation.
Step 1: Shut Off the Main Water Supply
Your first critical action is locating and shutting off the main water supply valve. This stops new water from entering your home and gives you time to assess damage.
Most homes have a main shut-off valve where the water line enters the building. Common locations include under the kitchen sink, in the basement near the foundation wall, in a utility closet, outside in a ground-level box, or in the crawlspace.
Turn the valve clockwise until it stops. A quarter turn is often enough, don’t force it. If stuck, wrap a cloth around it for better grip and apply steady pressure.
Take a photo of your main water shut-off valve and post it on your refrigerator. In an emergency, knowing exactly where it is saves precious minutes.
Step 2: Turn Off Electricity to Prevent Shock
Water and electricity are deadly. If water has reached electrical outlets, switches, appliances, or your electrical panel, cut power immediately.
Locate your circuit breaker panel and switch off the main breaker if water is actively spreading. If water is contained to one area, selectively shut off breakers serving that zone. Label your breakers beforehand so you know which switches control which rooms.
If water has reached your electrical panel itself, do not touch it. Call the fire department or your electrical utility.
Step 3: Relieve Water Pressure by Opening Faucets
After shutting off the main supply, open several faucets throughout your home, kitchen sink, bathroom sinks, shower, and outdoor hose bibs. This releases residual water pressure trapped in the pipes and prevents additional water from spraying out of the burst pipe.
Start with faucets on the lowest level and work upward. Leave them open for several minutes until water stops flowing.
Finding and Using the Emergency Water Shut Off Valve
The main water shut-off valve controls all water entering your property and is your first line of defense. It typically appears as a small wheel or lever attached to a copper or PVC pipe, usually painted red or yellow.
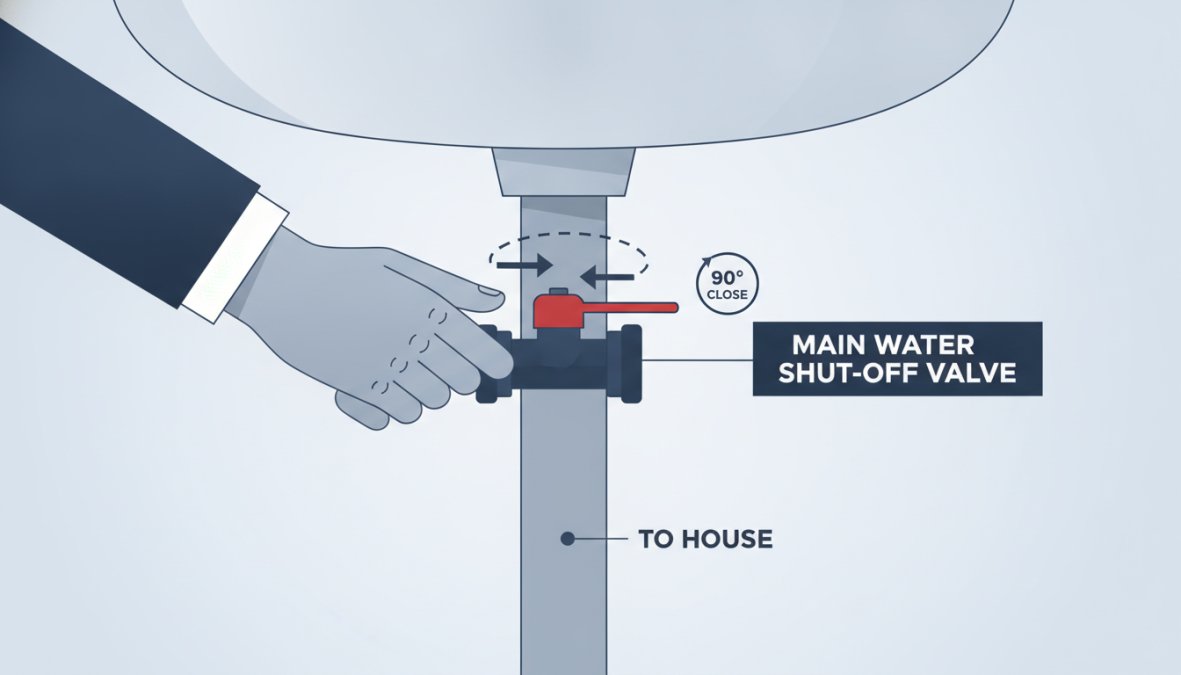
Test your shut-off valve twice a year by turning it clockwise a quarter turn. This prevents it from seizing due to mineral buildup. If it won’t budge, apply penetrating oil and wait 24 hours before trying again.
Apartment-Specific Shut-Off Procedures
Apartment dwellers may not have access to the building’s main shut-off. Contact your building management or superintendent immediately when you discover a burst pipe. Keep their emergency number posted in your phone.
If you cannot reach building management, call the water utility directly. They can shut off water at the street meter, though this takes longer.
Some apartments have individual water meters in a utility closet. Locate yours now, identify the shut-off valve, and take a photo. In an emergency, you can shut off water to your unit without waiting for building staff.
Apartment residents should request a building floor plan showing all water shut-off locations and keep it easily accessible.
How to Fix a Leaking Pipe Temporarily
Once you’ve shut off the main supply, a temporary repair can prevent further damage while you wait for professional help. Temporary patches are emergency measures only, you still need a professional plumber to replace the burst section.
Never attempt a permanent repair yourself. The pipe’s structural integrity is compromised, and improper repairs cause future leaks or contamination.
Emergency Temporary DIY Patches Using Compression Fittings
A compression fitting works best on small pinhole leaks or hairline cracks. For a burst pipe, this temporarily slows water flow.
You’ll need a compression coupling (sized to match your pipe diameter), two compression nuts and ferrules, a wrench, and a bucket.
First, dry the damaged section completely. Position the compression coupling over the damage, centering it so ferrules contact the pipe on both sides. Slide the first compression nut onto the pipe, then the ferrule, then the coupling body. Repeat on the other side. Hand-tighten both nuts, then use a wrench to snug them an additional quarter turn. Do not over-tighten.
Open the main shut-off valve slowly and watch for leaks. If water drips, tighten the nuts another quarter turn. This temporary seal should hold for days or weeks.
Pipe Insulation and Temporary Wrapping Methods
For smaller leaks, self-fusing silicone tape can create a temporary seal. Wrap it around the damaged section, overlapping each wrap by 50 percent. Start wrapping two inches before the damage and continue two inches past it. This method holds for several days.
For larger cracks, combine silicone tape with a rubber patch and hose clamp. Cut a patch from rubber or an inner tube, position it over the crack, and secure it with two hose clamps. Tighten evenly to avoid pinching the pipe.
These are emergency measures only. Schedule a professional plumber within 24-48 hours.
Never wrap duct tape around a burst pipe. Duct tape degrades when wet and loses adhesion within hours, giving false security while water continues damaging your home.
Signs of a Burst Pipe in Wall and How to Detect It
Not all burst pipes are obvious. A pipe hidden inside a wall can leak for days before you notice external signs.
Watch for these warning signs:
Visible water stains or discoloration on walls, ceilings, or floors indicate water moving through the structure. Stains often appear as brown, yellow, or gray patches.
Soft or spongy drywall that feels damp suggests water saturation behind the wall.
Mold or mildew smell is often the first sign of a hidden leak. If a room smells musty but you see no visible water, a pipe is likely leaking.
Reduced water pressure at specific faucets may indicate a leak in the line feeding that area.
Unexplained increase in water bills is a reliable indicator of a hidden leak. A burst pipe can waste 250 gallons per day.
If you suspect a burst pipe in a wall, call a professional plumber for inspection. They use moisture meters and thermal imaging to locate hidden leaks without tearing apart walls. The inspection cost ($150-300) is far less than water damage remediation.
Water Removal and Drying Techniques
Once the burst pipe is shut off, remove standing water and dry affected areas. Standing water causes mold, structural damage, and electrical hazards.
Remove standing water using a wet/dry vacuum, mop and bucket, or pump for large volumes. Work from outside edges toward the center. If water has reached electrical outlets, use only wet/dry vacuums rated for water removal.
For water trapped in walls or under flooring, professional equipment is necessary. Industrial dehumidifiers, air movers, and moisture meters extract water from hidden spaces and prevent mold growth.
Open windows and doors to increase air circulation. Run ceiling fans to move air across wet surfaces. If weather permits, remove wet drywall, insulation, and flooring to expose structural elements for drying.
Preventing Mold and Moisture Damage
Mold begins growing within 24-48 hours of water exposure. Keep affected areas dry and well-ventilated for at least 72 hours after water removal.
Run dehumidifiers continuously until moisture levels drop below 50 percent. A hygrometer (humidity meter) costs $15-30 and tells you when an area is dry enough. Most areas need 3-7 days of continuous dehumidification.
Do not paint, seal, or cover wet areas until completely dry. Sealing moisture inside walls creates a perfect environment for mold and rot.
If you see visible mold growth, do not attempt removal yourself. Contact a certified mold remediation company immediately.
Understanding Burst Pipe Repair Cost and Insurance Claims
The cost of burst pipe repair depends on location, pipe material, and extent of damage. A simple repair of an exposed pipe might cost $300-800, while a burst pipe inside a wall can exceed $3,000.
Water damage restoration adds significantly to the bill. Removing standing water, drying walls, replacing damaged insulation, and mold remediation can total $5,000-25,000.
Most homeowner insurance policies cover burst pipes and resulting water damage, but coverage varies. Review your policy to understand your deductible and coverage limits.
Insurance Claim Documentation Checklist
Document everything for your insurance claim. Photos and records significantly increase claim approval and settlement amounts.
Immediate documentation (within first 24 hours):
- Take photos and videos of all visible water damage
- Photograph the burst pipe and surrounding area
- Document water stains, wet drywall, and affected flooring
- Record the date, time, and weather conditions
Damage inventory:
- List all damaged items (furniture, appliances, personal property)
- Take photos of each damaged item
- Note original cost and approximate age
- Keep receipts or proof of purchase if available
Professional assessment:
- Obtain a written estimate from your plumber for pipe repair
- Get a water damage restoration estimate from a certified company
- Request mold assessment if mold is suspected
- Keep all invoices and receipts
Communication:
- Report the claim to your insurance company within 24-48 hours
- Keep your claim number for all future communications
- Submit photos and documentation within your insurer’s timeframe
- Keep copies of all emails, letters, and correspondence
Do not throw away damaged items until your insurance adjuster has inspected them. Insurance companies often require physical evidence of damage before approving claims.
When to Contact a Professional Plumber
While temporary repairs buy you time, a professional plumber must assess and repair any burst pipe.
Call a plumber immediately if:
- Water is actively spraying from the burst pipe
- The burst is inside a wall, ceiling, or floor
- The pipe is made of unfamiliar materials
- The temporary repair fails or water continues leaking
- Multiple pipes show signs of damage
- Water has been leaking for an extended period
A professional plumber can locate the exact source using pressure testing and thermal imaging, assess whether the pipe can be repaired or replaced, determine if other pipes are at risk, and provide a warranty on repair work.
For water damage restoration beyond simple pipe repair, contact a certified restoration company. They provide 24/7 emergency response and handle water removal, structural drying, and mold prevention, services that prevent long-term damage and protect your property’s structural integrity.
Common Mistakes to Avoid During a Plumbing Emergency
Most homeowners make critical errors during burst pipe emergencies that worsen damage and complicate recovery.
Mistake #1: Ignoring the problem. A burst pipe does not self-seal. Water continues flowing until you shut off the main supply. Every minute of delay adds thousands in damage.
Mistake #2: Using duct tape or caulk as permanent fixes. These materials fail within hours under water pressure. Temporary patches are emergency measures only.
Mistake #3: Attempting permanent repairs yourself. Soldering requires proper technique and experience. A poorly soldered joint will fail and create a worse leak.
Mistake #4: Waiting to contact insurance before addressing water damage. Address the immediate emergency first, then contact insurance. Insurance companies expect you to take reasonable steps to prevent further damage.
Mistake #5: Not documenting damage thoroughly. Without photos and detailed records, insurance companies may deny claims or offer low settlements.
Mistake #6: Ignoring signs of hidden leaks. Water stains, mold smell, or pressure loss indicate investigation is needed. Professional inspection catches hidden damage early.
Mistake #7: Attempting to dry walls without professional equipment. Opening windows and running fans is insufficient for water trapped in walls. Professional dehumidifiers and air movers prevent mold growth in hidden spaces.
Mistake #8: Skipping professional water damage assessment. You may see surface water but miss structural damage, hidden moisture, or mold risk.
A burst pipe demands immediate action. Shut off the main water supply, turn off electricity to affected areas, and open faucets to relieve pressure. These three steps stop the emergency and give you time to contact professionals.
For water damage restoration beyond simple pipe repair, professional expertise protects your property and your peace of mind. Contact a certified restoration company immediately for emergency water mitigation and restoration services.
External Sources Referenced
The information in this guide draws from industry best practices and authoritative sources on water damage mitigation and plumbing emergencies. According to the National Association of Home Builders water damage statistics, water damage claims represent one of the most frequent and costly homeowner insurance claims. Research from the Institute of Inspection, Cleaning and Restoration Certification (IICRC) guidelines establishes professional standards for water damage assessment and restoration. The Environmental Protection Agency’s guidance on mold prevention after water damage provides evidence-based recommendations for preventing mold growth within the critical 24-48 hour window following water exposure.
Frequently Asked Questions
What is the first thing to do when a pipe bursts?
Immediately shut off the main water supply at the shut-off valve to stop water flow and prevent further flooding. Locate your main water shut-off valve (typically near the water meter or where the water main enters your home) and turn it clockwise. If you cannot find it, turn off electricity to affected areas to prevent electrical hazards, then open all faucets to relieve water pressure. Call an emergency plumber while you take these steps.
How do I find the emergency water shut off valve in an apartment?
In apartments, the main shut-off valve is often located in a utility closet, basement, or mechanical room, sometimes shared with other units. Check your lease or contact your building management for its exact location before an emergency occurs. If you cannot locate it quickly during a burst pipe crisis, contact your landlord or building maintenance immediately. Know the location of your unit's individual shut-off valve as well, typically found under the kitchen sink or in a bathroom cabinet.
Can I temporarily fix a burst pipe myself, and how?
Yes, temporary repairs can buy time before professional help arrives. Use compression fittings, epoxy putty, or pipe repair tape to seal small leaks. For burst sections, wrap the damaged area tightly with waterproof tape or use a pipe clamp. These DIY patches are NOT permanent solutions, they typically last hours to days depending on water pressure. Always follow with professional pipe repair using proper solder or PEX materials. Temporary fixes prevent additional water damage and property damage while you arrange permanent repairs.
How should I document water damage for an insurance claim?
Take photos and videos of all affected areas, damaged furniture, and water pooling before cleanup begins. Document the burst pipe location, water flow patterns, and damaged materials (drywall, flooring, insulation). Keep receipts for emergency water removal services and any temporary repairs. Create a detailed inventory listing damaged items with estimated values. Contact your insurance company promptly to report the claim and ask about coverage limits. Professional restoration companies like Aquaflame Restores It can assist with documentation and often handle direct insurance billing to streamline your claim process.
This article was written using GrandRanker