
Table of Contents
- What Is Water Mitigation: A Detailed Guide
- Categories of Water Damage and Why They Matter
- Emergency Response: First Steps in Water Mitigation
- The Water Mitigation Process: What Professionals Do
- Water Damage Restoration and Insurance Claim Documentation
- Preventing Secondary Damage: Mold Prevention and Sanitization
- Signs You Need Professional Water Mitigation Services
- Common Mistakes in Water Mitigation: What Not to Do
Last Updated: July 22, 2026
What Is Water Mitigation: A Detailed Guide
Water mitigation is the immediate emergency response to prevent further damage when water intrusion occurs. At Aquaflame Restores it, we understand that the first hours after water damage are critical, every minute counts in preventing secondary damage, mold growth, and structural deterioration. Unlike water restoration, which focuses on complete repair and reconstruction, water mitigation is the urgent first step that stops damage progression.
Water seeps into walls, saturates subflooring, and migrates through structural materials within 24-48 hours. According to the IICRC (Institute of Inspection, Cleaning and Restoration Certification), proper water mitigation within the first 24 hours reduces secondary damage by up to 80%, resulting in faster recovery, lower restoration costs, and significantly reduced mold risk.
The 24-hour window is critical. After one day, water begins breaking down drywall, warping wood, and creating the perfect environment for mold growth. Speed in water mitigation directly correlates with lower total restoration costs.
Water Mitigation vs. Water Restoration: Key Differences
Water mitigation is emergency stabilization that happens immediately after water damage occurs. The goal is to stop additional damage, remove standing water, dry structural materials, and prevent mold. This phase typically takes 3-7 days and focuses on containment and prevention.
Water restoration is comprehensive repair and reconstruction that begins after mitigation is complete. It involves replacing damaged materials, rebuilding structural components, and returning the property to pre-loss condition. This phase can take weeks or months depending on damage severity.
Think of it this way: mitigation is triage, restoration is surgery. Professional restoration teams won’t begin permanent repairs until water mitigation has stabilized the property and confirmed moisture levels are within acceptable ranges.
Hiring the cheapest mitigation contractor without verifying they’ll coordinate with your restoration team creates gaps in documentation and disputes over what damage was water-caused. Always confirm your mitigation contractor will provide detailed moisture readings and formal drying certification.
Categories of Water Damage and Why They Matter
The IICRC defines three categories of water damage based on contamination level, which determines handling requirements and material salvageability.
Category 1 water is clean water from sanitary sources: broken water supply lines, rainwater, or melting snow. It poses minimal health risk if exposure is brief, but becomes Category 2 or 3 if it sits for more than 24-48 hours due to bacterial growth.
Category 2 water contains significant contamination and poses health risks. This includes water from washing machines, dishwashers, or toilet overflow. It requires personal protective equipment during mitigation and specialized sanitization protocols.
Category 3 water is grossly contaminated and poses serious health hazards. This includes sewage backup or floodwater mixed with fecal matter. It requires full hazmat protocols and professional-grade sanitization.
Your insurance adjuster will classify the water damage based on its source. The category determines what can be saved, Category 1 water damage to drywall might allow salvage if dried within 48 hours, while Category 3 water damage requires complete replacement.
Emergency Response: First Steps in Water Mitigation
The first 24 hours after water damage are critical. Here’s what needs to happen immediately.
Step 1: Stop the water source (5-15 minutes)
If water is actively flowing, locate and shut off the source. For a burst pipe, find the main water shutoff valve. For roof or window leaks, move valuables away from the affected area. If you cannot safely stop the water due to electrical hazard or structural danger, leave the property and call professionals.
Step 2: Document everything (15-30 minutes)
Take photos and videos of all water damage before touching anything. This documentation is essential for your insurance claim.
Step 3: Move valuables and prevent secondary damage (30-60 minutes)
Remove important documents, electronics, and sentimental items from the wet area. Move furniture to dry zones if possible. Don’t throw away damaged materials yet, your adjuster may need to see them.
Step 4: Call a professional water mitigation company (immediately)
For significant water damage (more than 100 square feet of standing water), professional mitigation is essential. Professional teams have the equipment, training, and insurance to handle water extraction, dehumidification, and moisture monitoring safely. They also provide documentation for insurance purposes.
The difference between a $5,000 mitigation job and a $50,000 restoration project often comes down to response time. Water that sits for 48 hours begins breaking down structural materials and creating mold.
DIY vs. Professional Thresholds: When to Call Experts
DIY territory (minor water damage):
- Small isolated spills: less than 10 gallons of Category 1 water
- Minor roof leaks affecting one small area (less than 50 square feet)
- Condensation or humidity issues without standing water
For these situations, you can remove water with towels and a wet/dry vacuum, open windows for ventilation, and run fans. However, if the area doesn’t dry completely within 48 hours, call professionals.
Professional-only territory (significant water damage):
- Standing water deeper than 1 inch
- Water damage affecting more than 100 square feet
- Any Category 2 or Category 3 water
- Water intrusion into walls, subflooring, or crawlspaces
- Damage from washing machine, dishwasher, or toilet overflow
For these situations, you need industrial-grade water extraction equipment, structural drying expertise, and moisture monitoring. The cost of professional mitigation (typically $1,500-$4,000 for residential jobs) is far less than the cost of mold remediation or structural repair.
Most insurance policies require you to take immediate action to prevent additional damage. Delaying mitigation to wait for an adjuster violates your policy terms and can result in claim denial. Call professionals immediately and provide your insurance company with the mitigation report afterward.
The Water Mitigation Process: What Professionals Do
Professional water mitigation follows a structured protocol designed to stop damage progression and prepare the property for restoration.
Assessment and categorization (first 30 minutes)
The mitigation team assesses water source, category, and extent of damage. They identify affected areas, determine if structural materials are compromised, and check for safety hazards.
Water extraction (1-4 hours)
Standing water is removed using submersible pumps, truck-mounted extraction units, and portable extractors.
Initial drying setup (2-6 hours)
Air movers (large fans) are positioned throughout affected areas to promote evaporation. Dehumidifiers are placed strategically to remove moisture from the air.
Moisture monitoring (daily for 5-7 days)
Technicians use moisture meters and hygrometers to track moisture levels in walls, flooring, and structural materials. This prevents the mitigation team from leaving too early, a common cause of hidden mold.
Sanitization (as needed)
For Category 2 or 3 water, antimicrobial treatments are applied to affected surfaces to prevent microbial growth.
Documentation and certification (final day)
The mitigation team provides a formal drying report showing moisture readings, equipment used, dates of service, and final certification that the property is dry and stable.
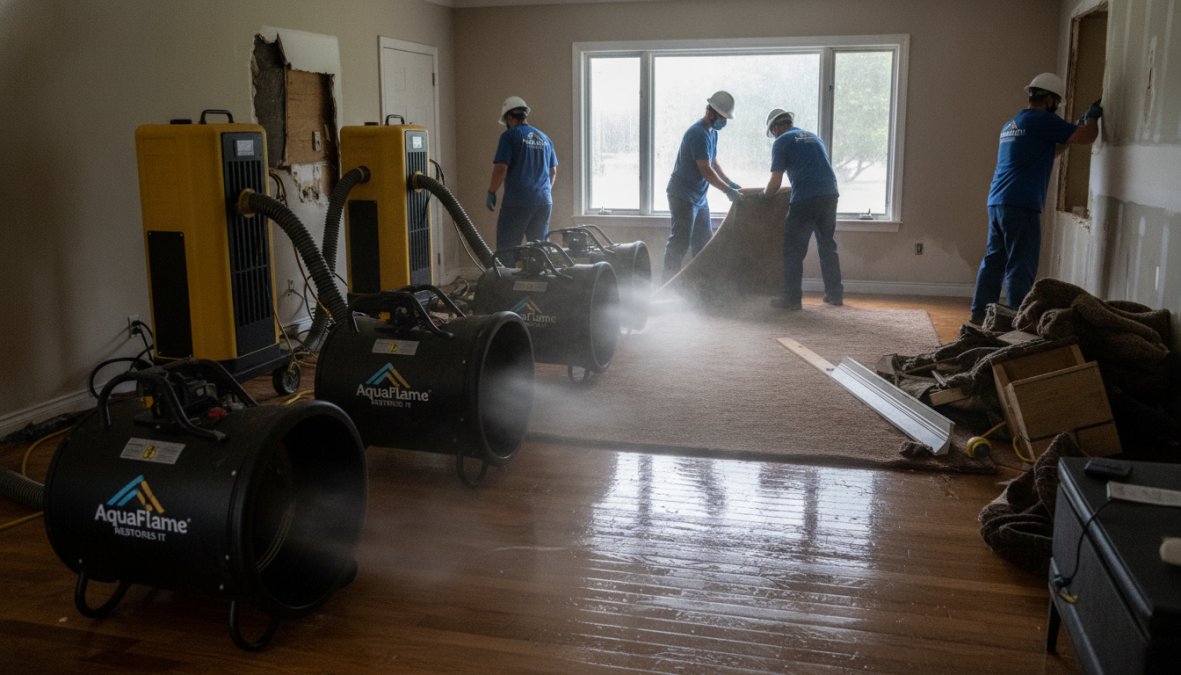
The entire process typically takes 5-7 days for residential water damage.
Water Extraction and Structural Drying Techniques
Water extraction methods:
Submersible pumps handle large volumes of standing water. Truck-mounted extraction units can remove thousands of gallons per hour. Portable extractors handle smaller areas.
Structural drying techniques:
After standing water is removed, moisture remains trapped in materials. Air movers are large fans that create high-velocity airflow to evaporate moisture from surfaces. Dehumidifiers pull moisture from the air and expel dry air back into the space. Equipment placement matters enormously, air movers should create cross-flow, pushing humid air toward dehumidifiers.
Moisture monitoring tools:
Hygrometers measure relative humidity in the air. When humidity drops below 60%, mold risk decreases significantly. Moisture meters measure moisture content in materials like wood and drywall. Thermal imaging cameras identify cold spots where moisture is trapped.
Professional teams take moisture readings every 24 hours and adjust equipment placement based on results.
Moisture Monitoring and Dehumidification
Moisture can be trapped deep within walls, subflooring, and structural cavities for weeks. Professional moisture monitoring uses specific thresholds:
- Wood: 12-16% moisture content
- Drywall: 12-14% moisture content
- Concrete: typically 3-5% for finished surfaces
If drywall is left at 18% moisture content, mold will begin growing within 48 hours. If wood subflooring is left at 20% moisture content, structural rot begins.
Dehumidifiers work by pulling humid air across cold coils, condensing moisture, and collecting it in a reservoir or drain line. Professional teams size dehumidification to the space and continue monitoring until readings stabilize for 24-48 hours. Premature equipment removal is a leading cause of hidden mold that emerges weeks after mitigation is "complete."
Water Damage Restoration and Insurance Claim Documentation
After water mitigation stabilizes your property, the restoration phase begins. Restoration is where damaged materials are replaced and your property is restored to pre-loss condition.
Documentation during mitigation:
The mitigation contractor should provide:
- Detailed photos of water damage before and after extraction
- List of materials removed
- Moisture readings showing initial saturation and final drying levels
- Equipment used and dates of service
- Certification that the property is dry and safe for restoration
Documentation during restoration:
The restoration contractor should provide:
- Detailed estimate of repair costs, broken down by item
- Photos of damaged materials before removal and underlying structure after removal
- Receipts for materials purchased
- Labor records showing hours spent on specific tasks
- Final photos of completed work
Using a single contractor for both mitigation and restoration ensures consistent and complete documentation.
Insurance Claim Documentation Guide: What Adjusters Need
Your insurance claim is only as strong as your documentation. Adjusters review photos, receipts, contractor reports, and material lists to determine claim payout.
Water damage documentation (from mitigation):
- Photos showing water extent, depth, and affected materials
- Water category identification
- Moisture readings from affected materials
- List of materials removed due to water damage
- Dates and times of mitigation work
Damage assessment:
A detailed estimate showing specific materials damaged, unit costs, labor costs for removal and replacement, and any code-required upgrades.
The most common documentation mistake is failing to photograph damaged materials before removal. Once wet drywall is torn out and thrown away, you can’t prove to an adjuster that it was actually damaged by water. Always photograph before demolition.
Keep all mitigation and restoration documentation in one folder, organized by date. When your adjuster requests specific information, you can provide it immediately. This responsiveness speeds up claim approval and often results in higher payouts.
Preventing Secondary Damage: Mold Prevention and Sanitization
Secondary damage is the hidden cost of water mitigation done poorly. Mold is the primary secondary damage risk, beginning within 24-48 hours of water exposure if moisture remains.
Professional water mitigation prevents mold through:
- Complete water extraction
- Structural drying to target moisture levels
- Continuous dehumidification until humidity drops below 50%
- Moisture monitoring with daily readings
For Category 2 and 3 water, additional mold prevention includes antimicrobial treatment of affected surfaces and removal of heavily contaminated materials that cannot be adequately sanitized.
Structural damage is the second major secondary damage risk. Water that remains in wood causes rot. Water in concrete causes spalling and structural failure. Professional drying prevents these problems by removing moisture before it causes permanent structural damage.
Signs You Need Professional Water Mitigation Services
Standing water: If water is pooling on floors, in crawlspaces, or in basements, you need professionals immediately.
Water from sewage or contaminated sources: Any water from a toilet, septic system, or outdoor flooding requires professional hazmat protocols.
Water in walls or subflooring: You cannot dry this yourself. Professional equipment and moisture monitoring are required to prevent hidden mold.
Wet insulation: Insulation that’s been saturated must be removed and replaced.
Odor or visible mold: The situation has progressed beyond mitigation into remediation.
Damage affecting more than 100 square feet: Large-scale water damage requires industrial equipment and expertise.
Common Mistakes in Water Mitigation: What Not to Do
Waiting for insurance before beginning mitigation: Your insurance policy requires immediate action to prevent additional damage. Call professionals immediately.
Using household fans instead of professional air movers: Professional air movers move 4,000-6,000 cubic feet per minute. Household fans move 1,000-2,000 CFM. You cannot dry a water-damaged structure with household fans.
Assuming the property is dry because the floor looks dry: Only moisture meter readings confirm that materials are actually dry.
Removing wet materials before documentation: Once you throw away wet drywall, you can’t prove to an insurance adjuster that it was damaged. Always photograph before removal.
Attempting to dry a basement with dehumidifiers alone: Professional teams use multiple dehumidifiers plus air movers to create the airflow needed.
Hiring the cheapest contractor without verifying credentials: A contractor without IICRC certification may miss hidden moisture or fail to properly categorize water.
Leaving windows open during dehumidification: Open windows introduce humid outdoor air, counteracting dehumidification efforts. Keep windows and doors closed during structural drying.
Stopping equipment too early: Moisture can remain in structural materials for weeks after surfaces appear dry. Professional teams monitor continuously and only remove equipment when readings confirm the property is actually dry.
Water damage is a crisis, but it’s manageable with the right immediate response. Water mitigation is not optional, it’s the difference between a contained problem and a catastrophic loss. The 24-hour window after water damage is when decisions determine whether your property recovers fully or suffers permanent damage.
Aquaflame Restores it provides 24/7 emergency water mitigation and complete restoration across metro Atlanta. Our IICRC-trained technicians arrive within 30 minutes with the equipment and expertise to stabilize your property, document damage for insurance, and coordinate seamless restoration. We handle direct insurance billing so you’re not fighting with adjusters while managing water damage. When water strikes, you need a team that responds immediately and sees the job through to completion.
Frequently Asked Questions
What is the difference between water mitigation and water restoration?
Water mitigation focuses on immediate emergency response, stopping water intrusion, extracting standing water, and preventing secondary damage like mold growth. Water damage restoration includes the full recovery process: repairs, reconstruction, and returning your property to pre-damage condition. Mitigation happens first and fast; restoration follows once the property is stabilized and dried. Both are essential for complete recovery.
What are the three categories of water damage, and how do they affect my property?
Category 1 water is clean (burst pipes, rainwater) and poses minimal health risk. Category 2 water contains contaminants (washing machine overflow, toilet backup) and requires sanitization. Category 3 water is heavily contaminated (sewage, floodwater) and poses serious health hazards requiring professional remediation. The category determines extraction methods, safety protocols, and whether sanitization is required. IICRC standards classify damage by category to ensure appropriate response.
How quickly should I call for water mitigation after discovering damage?
Call immediately, within the first 24-48 hours. Fast response prevents microbial growth, structural deterioration, and secondary damage. Water intrusion spreads rapidly through subfloors, walls, and insulation, causing mold and weakening structural integrity. Professional 24/7 emergency response teams can begin water extraction and moisture monitoring before damage becomes catastrophic. The longer water sits, the higher your restoration costs and health risks.
Does homeowners insurance typically cover water mitigation costs?
Coverage depends on the water source. Sudden, accidental damage (burst pipes, storm flooding) is usually covered. Gradual leaks, poor maintenance, or sump pump failure may not be. Review your policy's water damage clause and contact your insurer immediately. Professional restoration companies often handle direct insurance billing, managing claims documentation and reducing your out-of-pocket burden. Clear documentation of damage, photos, and receipts strengthen your claim.
This article was written using GrandRanker